When conducting a follow-up examination for a scleral lens patient, it’s essential to approach the evaluation of the lens and eye after wear in an organized manner. This ensures efficiency and reduces chair time.
Case History:
Begin the exam by asking the patient open-ended questions about their scleral lens experience. Keep in mind, that some patients may view this as their last alternative before considering surgery, which can make them hesitant to discuss any issues or discomfort. Providing reassurance is crucial in these cases. When patients understand that improvements can be made to the lens design, comfort, and vision, they are more likely to speak openly about their experience.
Key questions to ask include:
- How long have you had the lenses in today? Ideally, the lenses should have been worn for at least three hours, with longer wear being preferable to ensure they are well-settled and to allow for more accurate assessment of any changes in sag height.
- What is your typical wear time? This helps gauge general comfort and tolerance to the lenses.
- Do the lenses cause discomfort, and if so, when and where? This information can help identify potential issues, such as edge lift if discomfort occurs early in the day, or impingement or compression if it happens later.
- How difficult are the lenses to remove?
- Is there any redness during the day or after removal, and does it subside?
- Finally, ask about their lens care routine, including the solutions they use. It is important to make sure that the patient isn’t using any filling solution that contains preservatives. Then proceed to over-refract the lens.
Lens Evaluation:
Like the fitting examination and evaluation, follow-up assessments involve examining the central/apical sagittal height and landing zone. Evaluating the limbus can be challenging without using fluorescein under the lens. OCT measurements are valuable for assessing the sagittal height, limbus, and landing zone before removing the lens. Remember, if the lens is removed and reapplied with fluorescein, the settling of the lens is disrupted, making any subsequent measurements inaccurate.
A step-by-step, inside-out approach to lens evaluation is recommended for consistency.
- Start by inspecting the lens surface for wetting defects, front surface debris, cracks, scratches, or crazing.
- Next, locate the corneal apex and ensure there is sufficient clearance, using the center thickness as a guide if OCT is not available. It’s important to measure apical clearance rather than central clearance, as the apex of the ectasia may not always be in the center of the cornea.
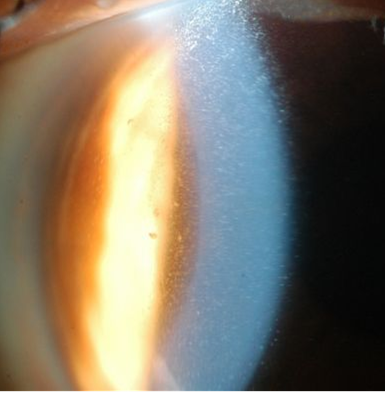
- Additionally, check for tear reservoir fogging, noting whether the debris is particulate, oily, or diffuse, and grade the severity for consistency (Figure 1).
- Next, assess the landing zone. Identify the lens markings, note the rotation of the lens (Figure 2), and determine the lens number.
- Patients may sometimes mix up lenses, so double-checking the lens markings is essential. You can define rotation by clock hours, but it’s often better to rotate the beam to determine the precise rotation in degrees.
Read more information about Visionary Optics Lens Markings here.
If there is compression or vessel blanching, note where it originates from the landing zone. Is it at the edge (toe down) or closer to the junction of the limbal and landing zones (heel down)? Measure any affected areas with your beam, especially if there’s a focal issue like a pinguecula, as Visionary Optics can create a notch or vault with a precision lift based on your observations. If a problem is detected in one section of the landing zone, examine the opposite side along the same meridian. For example, if you observe heel-down compression nasally, check temporally. If both quadrants are affected, check superiorly and inferiorly. If only one meridian is affected, you may need to design a toric landing zone or adjust the existing one. If all four quadrants are affected, you’ll need to loosen the lens 360 degrees.
With the patient still at the slit lamp, apply fluorescein to the eye or paint it across the lens surface. Evaluate any edge lift in all four quadrants and determine if the fluorescein is seeping under the lens, which is likely if tear reservoir debris is present. You might also notice a toric pattern where one meridian has edge lift and tear exchange while the other does not. In such cases, tighten or steepen the problematic meridian or quadrant. However, if the patient is comfortable and there is no debris, even with edge lift, no changes may be necessary.
Lens Removal:
It’s important to remove the lens yourself. If a patient reports difficulty removing the lens, it may be due to tightness or incorrect technique. Removing the lens yourself allows you to feel if there is suction. If the lens removes easily, you should reinstruct the patient on proper removal techniques.
Naked Eye Assessment:
- After removal, reapply fluorescein to the eye and check for corneal staining, which may indicate a preservative reaction (diffuse) or lens-cornea contact (focal).
- Evaluate the limbus for microbullae or staining, which suggests the need to change the limbal clearance or increase the overall lens diameter.
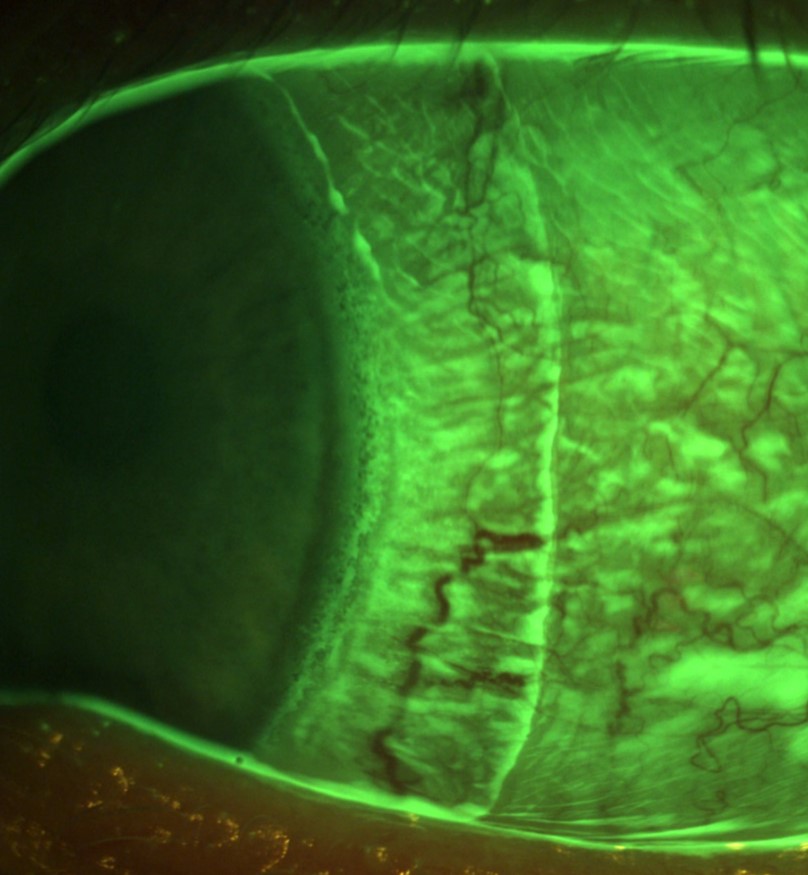
- Check the conjunctiva for arcuate staining indicative of impingement (Figure 3), and for conjunctival rebound redness, a sign of compression.
- While some patients may be mechanically hyperemic, those with compression will exhibit focal hyperemia where the lens was pressing too harshly on the tissue. This area will also be tender and mildly uncomfortable, necessitating a lens modification or remake.
Based on the evaluation of the lens on the eye and the condition of the eye without the lens, you can use this information to design the next lens if needed.
Dr. Lynette Johns, Visionary Optics’ Director of Clinical and Scientific Affairs is available to review this in more detail if you are new to scleral lenses or simply interested in a quick refresher. Below is the typical format that Dr. Johns uses to understand what the clinician is observing and how to change the lens. Please schedule a quick session with her if you have a challenging case.
Lens ID:
Wearing time:
Rotation:
Sag Height: Increase? Decrease? No change (in microns)
Limbus: Increase? Decrease? (in microns) No change? Or change diameter?
Diameter: Increase? Decrease? (in mm)
Landing zone: Flatten? Steepen? (in microns) No change?
Toricity: Increase? Decrease? (in microns and meridian axis in degrees)
Material:
Material color: Clear for right? Blue for left?
Hydra-PEG:
Dots: Black, white, clear
Over-refraction:

Figure 2. Note that the 3/9 o’clock hashmark has rotated approximately 30 degrees clockwise. It is crucial to document the rotation especially if the patient needs an astigmatic correction employing front surface toricity on the lens.
Figure 3. Arcuate conjunctival staining is caused by scleral lens landing zone (toe down) impingement. If left long-term, conjunctival hypertrophy can result.


